Adjust Media Thickness
|
Before you will be able to successfully run media through the printer; you will need to adjust the Clamshell height to accommodate the thickness of your media. A reference line, for assisting with the media thickness adjustment process, is provided on the clamshell frame; as shown here. Procedure: 1. Place a single piece of your media onto the operator side frame and push it lightly up-against the media thickness reference line decal. NOTE: If using multi-page or puffy media; compress the media (press down lightly on the surface of the media) to reveal the compressed thickness of the media. 2. Using Media Thickness control, from the printer’s Touchscreen, adjust to a value that places the bottom of the white reference line even with the top surface of your compressed media; as shown in image above. Please see “Media Thickness” found in the section titled “Touchscreen Menu Choices and Features” for details on accessing and using this feature.
NOTE: This procedure is meant to provide an approximate Media Thickness adjustment that will allow the media to successfully pass through the printer. However some experimentation (fine-adjustment, usually less than 0.5mm up/down) may be necessary to optimize media feeding.
|
|

|
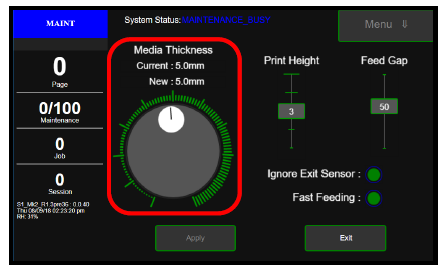
Media Thickness - Moves the Clamshell up/down (0.1mm to 10mm) to accommodate media thickness. To adjust and set the Media Thickness: 1. Tap the Media Setup button to open the Media Setup screen. 2. Under Media Thickness you will find the Current media thickess setting and the Dial used to adjust the media thickness. 3. To move the Dial, press and drag the Selector (small white circle) around the circular scale to obtain the desired (New) Media Thickness value. Selected value will be shown next to New. NOTE: After making any changes to items on this screen, the Apply button will turn RED and the Exit button will change to a Cancel button; giving you the ability to cancel any changes you have made and close the screen. 4. If New value is correct; tap the Apply button (currently RED) to confirm the change. The Clamshell will move up or down to the New thickness setting. During this time the Selector and New value will also turn RED. Once the Clamshell reaches the New thickness setting the Selector will turn WHITE again and the Apply button will turn GREEN again. In addition, the Current and New values will now match. 5. Tap the Exit button to exit the Media Setup screen. 6. You can test for proper setup using the “Test Path” button. Adjust as necessary. |
|